Building a cypress strip plank pedal drive canoe
From an idea to reality
For me, the canoe build started about 2 years ago. A few years back I had an inexpensive plastic kayak that I used all the time but had since sold. I wanted to be able to get back out on the water again but this time in a vessel that I built. Most people would go buy a set of plans and then start building. That’s pretty smart. For me, I decided to design my own canoe. I wanted to stand up in it. It had to fit in the back of the van. And most importantly, it had to have a pedal drive assembly from the hobie mirage kayaks. This would allow me to propel the canoe with my legs rather than a traditional paddle.
The build begins
Around May 2019, I created a set of 2d plans for the forms that I would build the hull around. I cut the forms on my CNC machine and assembled them on a strong back. With the forms in place, I used battens to check the forms for fair and sanded the forms as necessary for a smooth curve all over. This was around September of 2019.


Planking without staples
Once the forms were fair I could begin planking. Many canoes are built by stapling the planks to the forms and then going back and pulling out all the staples after the hull planks are all glued up. The negative is that this leaves rows of staple holes at each form location. The positive of this method is that it’s super fast. You could nearly plank an entire canoe in a day. I did not like the look of all the holes and didn’t want to go this route so I made clamping blocks that were clamped to the forms and then shims were used to force the cypress strips tight to the forms. I was only able to do 3 strips per side per day this way but it provided for a much cleaner finished product.

Making the strips
Gluing up the first strips 


Nearly whiskey plank time!


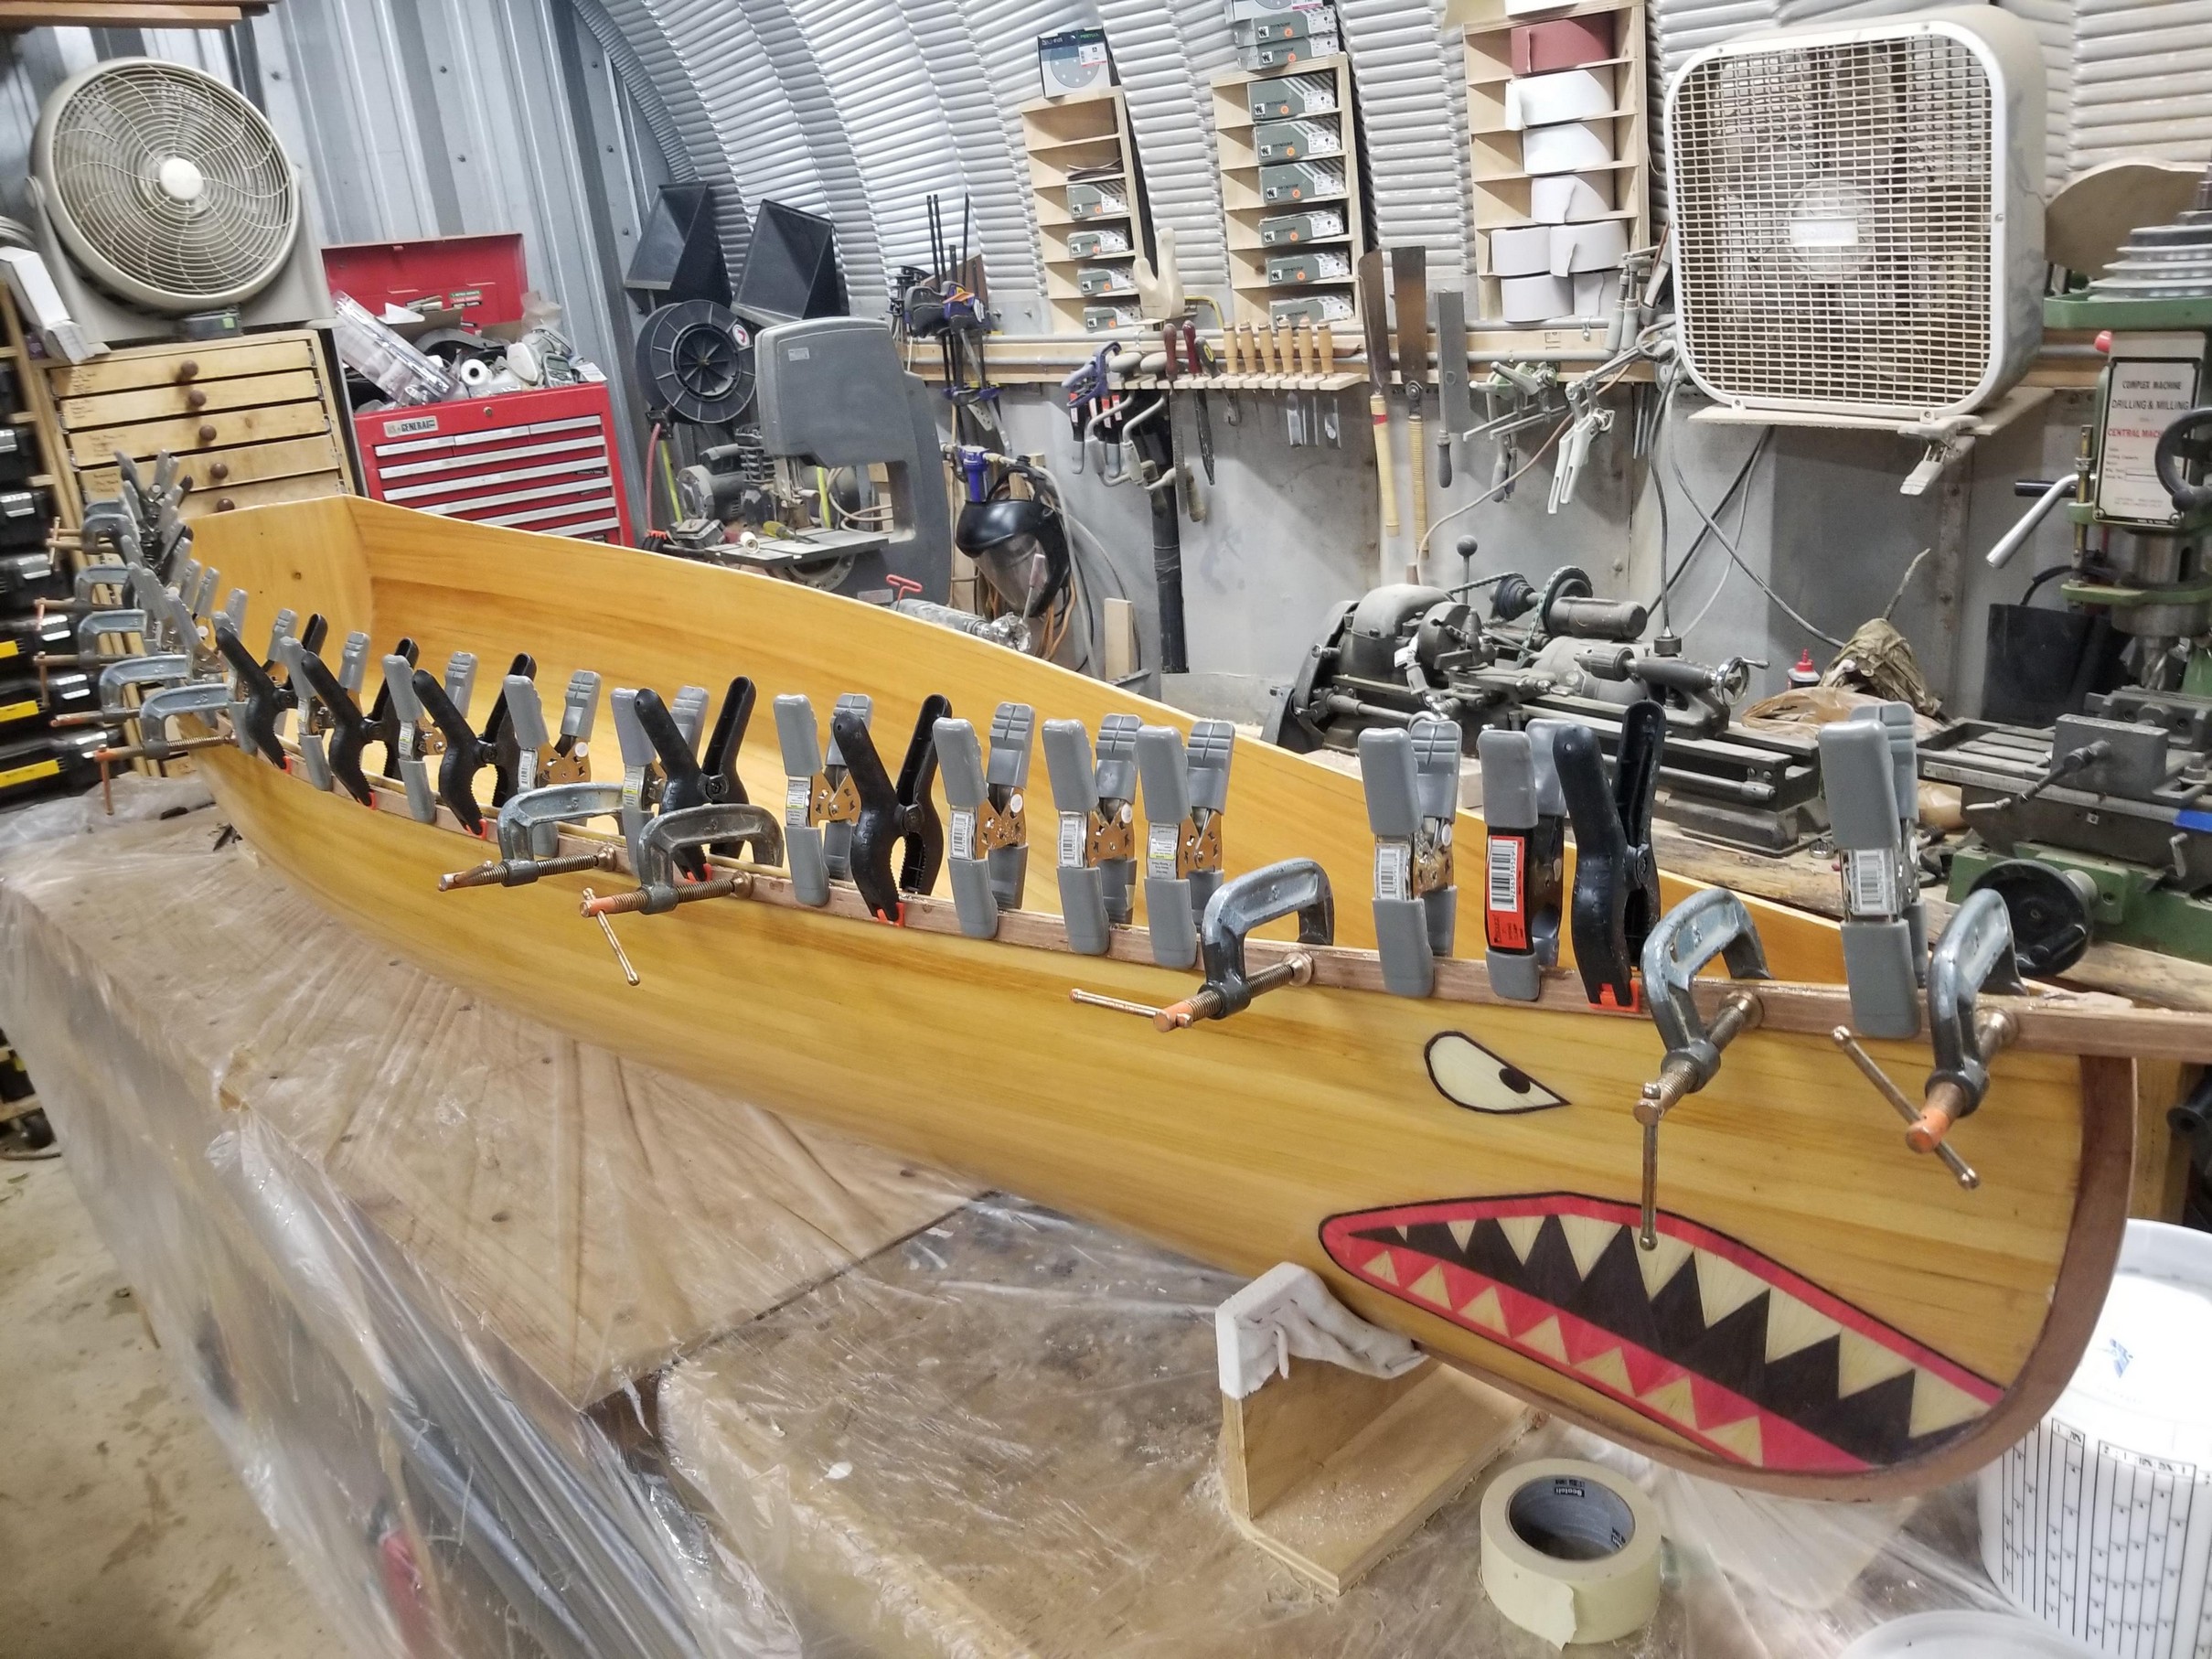
Straw marquetry sharks mouth
With the hull planked, I began sanding and fairing the planks on the outside of the hull. After the sanding I began working on the sharks mouth. I could have bought vinyl sharks mouth stickers and been done with it but that’s not my style. I decided for a more intricate approach. The method I used is called straw marquetry and it’s where they take straw (like hay), slice it along the length, and then iron it flat. In the case of the pieces I used, they were pressure dyed to be certain colors. It’s very expensive to purchase but the straw provides a radiance unmatched by other materials. It’s beautiful. What this ultimately means is that each tooth is made up of 4-6 tiny pieces of straw all cut into triangles to form the full shape of the tooth. I had nearly 40 hours into just the sharks mouth alone. But for the end result – totally worth it!


Even mega yachts have sharks mouths

Fiberglass time
With the sharks mouth complete, I coated the outside of the hull with a layer of 7oz fiberglass cloth soaked with epoxy. The white fiberglass cloth becomes transparent with soaked with epoxy which allows the beauty of the wood to show through while providing rigidity and protection to the hull. I then applied 2 more coats of epoxy to the cloth to completely fill in the weave which will leave me with a super smooth finish later on after final sanding. With the outside fiberglassed, it was time to pull the hull off of the molds and start on the inside. The same process was followed for the inside – sand, fair, and fiberglass. A second coat of epoxy was applied inside to help fill the weave.


Mahogany Keel
Next up was the keel. I used mahogany for the keel and did a bent lamination for the curve at the bow and then scribed the aft section of keel to fit out of a larger board. After the keel was installed I hand planed and sanded it into its final shape. I left the aft part of the keel taller so that when I drag the canoe up onto a beach, it would elevate and protect the hull from getting scratched up.
Gunnels and inwales
With the keel complete I started on the gunnels and the inwales. The gunnels are the boards at the top of the hull on the outside of the boat and the inwales are the same boards but on the inside of the boat. The gunnels I laminated out of 6 pieces of mahogany. The inwales are made from a single piece of mahogany with drain holes cut into them. The inwales are screwed in place from outside of the hull through the gunnels. Most builders would plug the screw holes, but for me, I didn’t want to see all of the plugs. So I added one more lamination to the outside and wound up with a very clean look.


Forward deck
At this point I can see light at the end of the tunnel. The build is getting close but there’s still a long way to go. This is where I was two weeks ago before deciding to finish the build before our 4th of July trip. Next up was the forward decks. I decided to add a bit more flare with this and used a thicker piece of cypress so that I could shape it nicely. I centered the graining of the board on the centerline of the canoe which provides for a nice look.
Compound curve bent inwales
And then I went and made things complex, again. I wanted the inwales to be continuous around the front deck. The only way this could be possible is with a bent lamination that was joined into the already installed inwales. This was a compound curve also so it made things that much more challenging. I ended up using 1/16″ strips of mahogany 2 1/2″ tall to be able to make the bend and then clamped it in place from every direction. After sanding and shaping it looks exactly like I wanted it to. Most folks would never pick up on this detail, but once again it provides for a cleaner finish even if it did add another 10 hours to the build.


It floats!
With the hull complete, it was time for a float test. We used our pool as our testing grounds. With this, I was able to determine where my seat needed to be to have the weight properly carried by the canoe. I also determined the location of the rod holders and the rudder controls. With the seat laid out, I could then lay out for the cut out of the pedal block. This was mildly stressful. You know, cutting a big hole in the bottom of a perfectly good canoe. Oh well, it’s what has to be done! So I laid it out and cut out the hole. I then finished building and shaping the pedal block and got it epoxied into place. At the same time I finished up a few remaining pieces of mahogany trim on the transom. At this point, the hull build is complete.


Finish work
I was really running short on time for our trip, so one of the corners I cut (which I will address later) is not doing a proper long block sanding before clear coating the hull. I machine sanded inside and out and got it smooth and ready for finish. Next up I sprayed 4 coats of an automotive clear coat to the exterior of the hull and I sprayed a coat of varnish to the interior of the hull and the woodwork. I then hand applied additional coats of varnish to just the woodwork. It looks great from a distance. Up close, you can see that it needs to be block sanded and then recoated. Oh well.


Rudder controls
The last major component was the rudder assembly. I mocked up some ideas and finally ended up using a bunch of stainless steel eye hooks as guides and some 100lb mono fishing line for controlling the rudder. I made a hand crank wheel that I mounted just below the gunnel. When you turn the wheel, the rudder turns. Looks like it should work. I applied a coat of varnish to the rudder and then turned my sights on the paddle. Even with the foot pedals, you still should have a paddle on board. I picked up a couple half complete paddle blanks from a canoe company in Okeechobee so I went ahead and finished shaping one and got a coat of varnish on it.

Accessorizing
Next up were the accessories. I mounted the rod holders and then mounted some nonskid rubber to the inside of the canoe along the bottom. This is where I’ll be dropping lures and sinkers as well as standing so I wanted a little cushion. And it looks great! One piece remains. When we float tested it, Oceana and I climbed in together. With the two of us, I laid out where our weight has to be and figured out that I couldn’t use the seat as I couldn’t get my weight far enough aft. For me to be able to pedal, I would need a back support. So the last piece I made was a teak back support/rod holder piece that I mounted near the back. I finished this up Friday night which was just in time to leave for our trip on Saturday morning.

The shake down cruise
Her maiden voyage on the intercoastal waterway at the campground went well. It pedals like a dream and having a rudder is super nice. My old kayak was a paddle (not pedal) kayak without a rudder and it was hard to keep it going straight. As I pedaled by you could hear the other campers oohing and aahhing and saying wow, look at that canoe! Let me just go ahead and pat myself on the back for a second. Oceana and I went for a ride and what we didn’t plan for but that worked out incredibly well was that she was able to pedal from up front. I kind of enjoyed being chauffeured around. All I had to do was steer! Check out the video at the bottom.


Final thoughts
We used the boat for the weekend including a night trip to watch fireworks on the 4th. After using it for the weekend, here’s some initial thoughts. I had left the aft part of the keel tall for dragging it onto the beach. The side effect from this is that it became very hard to steer. That tall part of the keel wants to keep the boat going straight. I’ll cut down the keel and see how she handles.
Steering and pedals
The steering system needs lots of work. I got my geometry off a little in running the control lines and while it functioned for a weekend, I wouldn’t say it works well. Also, the mono line has too much stretch to be used for controls. For the pedal assembly, I see a few areas inside the pedal blocks that need to be shaped so the pedals don’t contact the wood. There’s just a bit of damage from the pedals. I found that I preferred the canoe without the seat.
No seat
The seat is comfortable but pedaling from a lower position (using the backrest) was better than pedaling from the seat. At this point the backrest needs padding as it’s really uncomfortable. Also, by not using the seat, that’s one less piece to carry each time the canoe is loaded and unloaded. It also provides for more deck room for standing/kneeling while fishing. All in all it was a good trip and a good shake down cruise. I look forward to being able to spend more time on the water again.
Update
I’ve since added padding to the backrest and re-ran the steering controls. The padded backrest is great. For the steering controls – I replaced the 100lb mono with 1/32″ stainless steel cable ran through small pulley blocks. It now steers effortlessly. I also added a steering lock to maintain the rudder position without having to have a hand on the wheel. Lastly, I cut down the aft portion of the keel which has made a huge difference in steering. Definitely worth doing!
Comments are closed