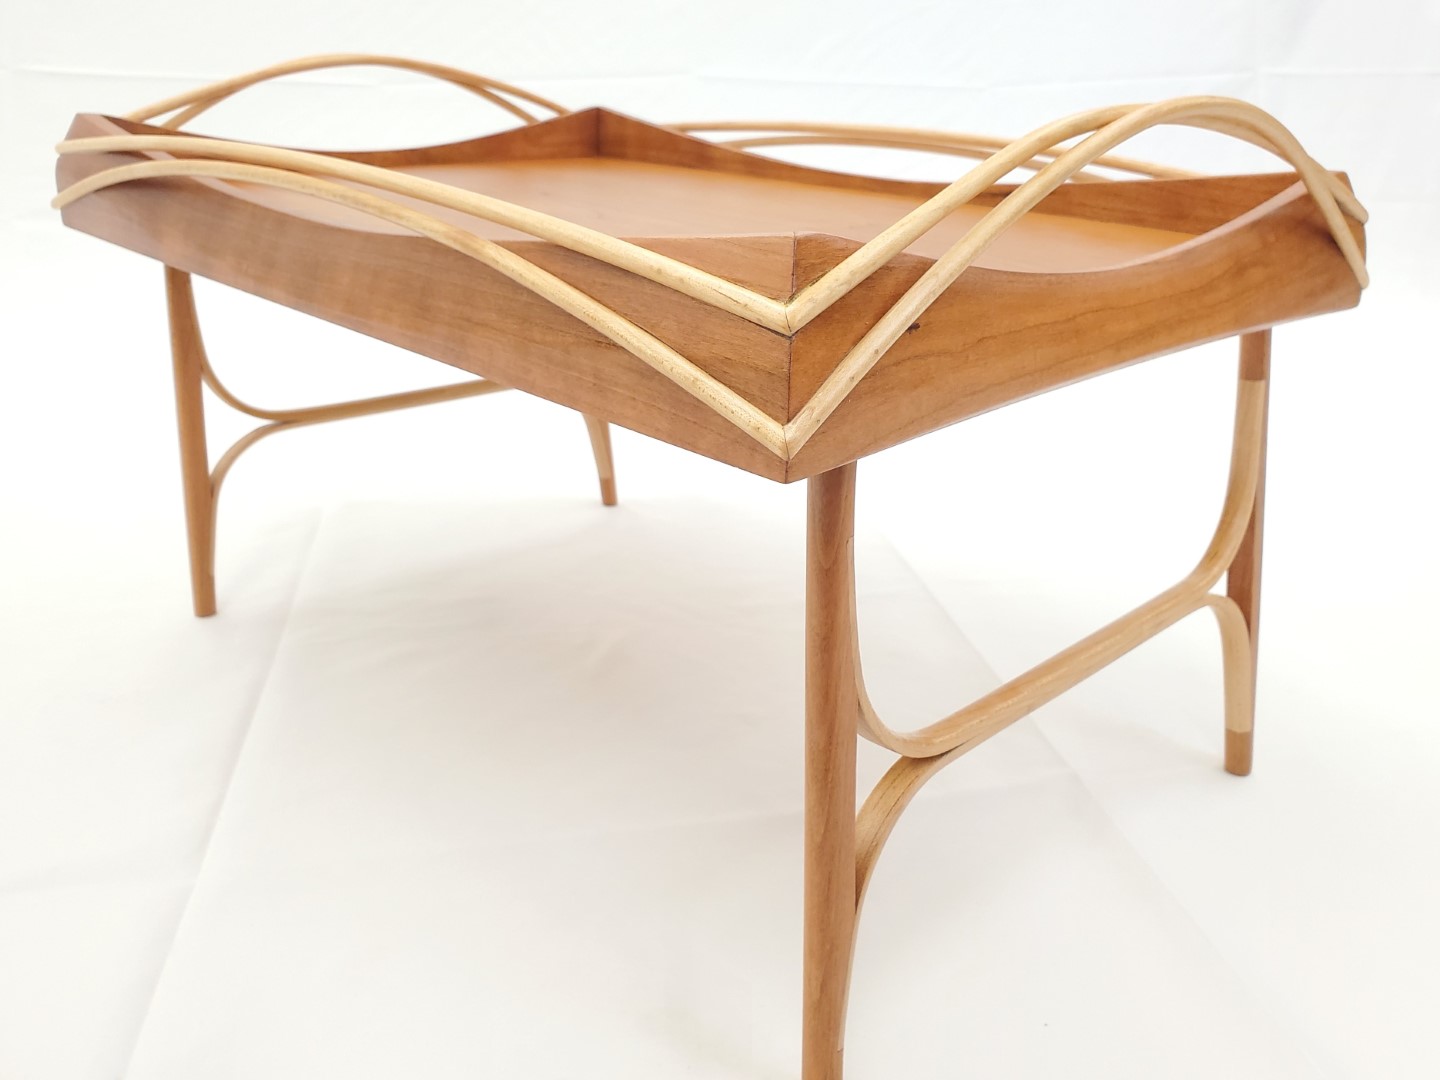
Cherry serving tray
I was commissioned to build a serving tray. The details were left up to me so long as it could hold a plate, silverware, condiments, and drinks as well as have a pair of legs for breakfast in bed. After laying out the critical dimensions, I settled on 12″x19″ of clear space inside the frame. This would allow for 9″ legs on the underside which would provide adequate space over a persons legs when sitting up in bed. It would also fit a full size plate with room on either side to spare.
Cherry and maple
I opted to use cherry and maple for the build. Both are beautiful and when combined, they are that much more stunning. The build started off pretty basic – a 3/4″ thick frame around a 1/4″ plywood bottom. I left 3/4″ below the bottom on the underside to hide the folding legs. Once the dimensions of the individual pieces were established, I started sketching out the dowel layouts in Aspire. After looking at multiple revisions, I finally settled on a two dowel layout for both the fronts and ends. The dowels on the ends would also serve as carry handles.
CNC and spokeshaves
With the radiuses established, I set up the CNC and cut the radius grooves for the dowels into the cherry frame. With the dowel cut outs complete, I laid out the radius on the frame that would sweep down towards the bottom plywood. I made this cut on the bandsaw and then cleaned it up with a spokeshave. With those cuts cleaned up, the piece was still too blocky. I opted to carve relief facets into each face along the upper radius of the frame to make the frame appear thinner. To do this I laid out the extents of facets and got to work with a spokeshave. I took care to leave a crisp edge where the facet meets the flat of the face.

More facets
The last bit of detailing was to add another radial facet to the bottom edge of the ends. This would create a bit of a shadow line and give the piece a touch more character. As the frame was now complete, I gave it a light sanding and then turned my sights to the dowels.
Dowel making
I opted to make my own dowels for this project. There are a handful of ways to make your own dowels, and what I ended up settling on was using my edge sander. I found this to give the cleanest and most consistent results. I milled a bunch of 1/4″x1/4″ maple strips and then got to work making dust and dowels. The jig worked well and now I was ready to start fitting the dowels into the grooves cut in the frame.
Tight radiuses
The dowels in the long sides made the bend just fine but the radius on the ends of the tray is too tight to use the maple dowels without breakage. I fired up the steam box and steam bent the dowels for the ends. I let these sit in clamps overnight before I started installing them.

Installing the dowels
The next day I began fitting the dowels. This was tedious. I started off with two spare dowels and worked the first joint. I left one of those dowels in place and grabbed a full length dowel. Using a bandsaw, disc sander, and sanding block, I fit the full dowel in place. Once I was happy, I epoxied it and pinned it in place. I repeated this process around the bottom layer of dowels and then again around the top. I’m really happy with how this is starting to look.


Starting on the legs
With the dowels complete, I gave the entire piece a final sand and began on the finish. For the finish, I’m opting for a blend of tung oil, epifanes varnish, and a touch of mineral spirits to thin out the mixture. I applied the first coat to the tray and then started working on the legs. The first step was to lay out the dimensions and then cut some jigs for steam bending the radius pieces of the legs. I then cut maple blanks and steam bent them around the forms. I left these to sit over the weekend before final fitting them into the leg frames.


Forming the legs
I used cherry legs and let the maple spreaders into the cherry legs. This gives it quite a unique look. I glued up the pieces and let them sit overnight. The next day I sanded off any glue residue and then rounded over the edges so that the parts were round. I then created a drilling jig and drilled the legs for their pivot point. With this complete, I installed them on the underside of the tray. The last piece of the puzzle was a catch to hold the legs in place.

Wood catches
I opted to make a small wood catch that just held the edge of the radius on the legs. It gives a nice crisp snap when putting the legs up but it’s still easy enough to fold the legs down. I gave the leg assembly a final sand and then gave it a coat of finish. I then installed the legs and did a few more coats of finish to the entire assembly.
Just beautiful!
I’m thrilled with how the piece turned out and the finish on it is exactly what I was after – subtle, yet stunning. Final photos can be found in the blog post found here.


Comments are closed